Table of Contents
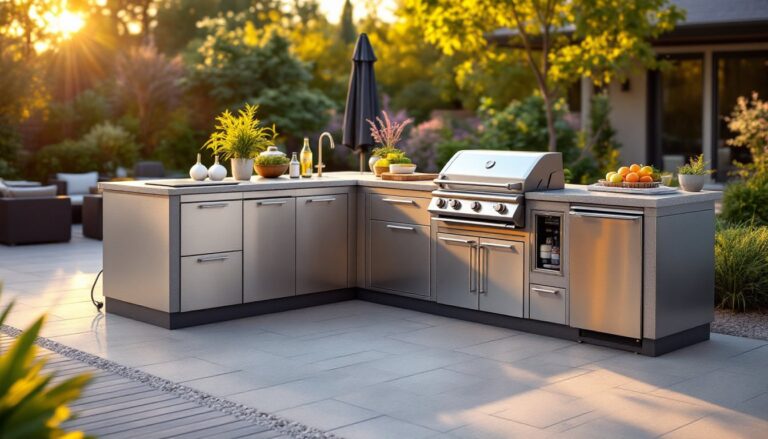
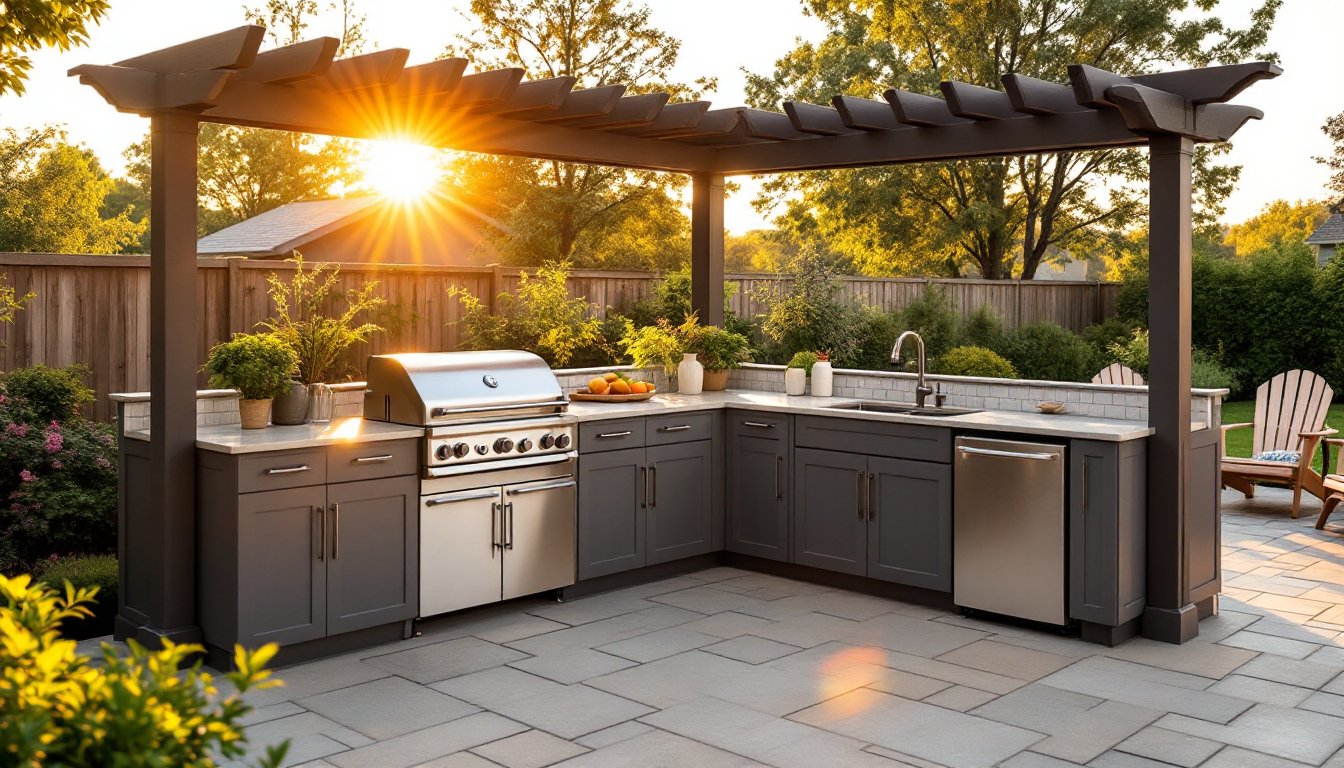
ToggleAn L-shaped outdoor kitchen is one of the smartest layouts for a functional backyard cooking space. Unlike straight galley kitchens, the L-shaped design creates two working walls that maximize counter and storage without consuming excessive square footage. This configuration keeps traffic flow clean, zones prep work away from the grill, and fits naturally into most yard corners. Whether you’re building from scratch or retrofitting an existing patio, an L-shaped outdoor kitchen adapts to your space, budget, and cooking style. Let’s walk through how to design, plan, and build one that works for your home.
Key Takeaways
- An L-shaped outdoor kitchen maximizes counter space and storage efficiency by using two perpendicular walls, making it ideal for modest yards and tight spaces.
- Position your grill on one leg facing the main seating area and prep/cold storage on the other leg to follow a professional cooking workflow and keep traffic out of your work zone.
- Invest in marine-grade or powder-coated outdoor cabinetry, stainless steel countertops or engineered stone, and a mid-range grill (40,000+ BTU) to ensure durability and a 7–10 year lifespan.
- Plan your L-shaped design with at least 8 feet per leg (10–12 feet is more comfortable), clear utility pathways, a 3-foot traffic bypass, and proper venting clearance before installation.
- Budget $5,000–$15,000 for a solid mid-range outdoor kitchen build, plus an additional $1,000–$5,000 for permits, utilities, and professional installation depending on your location.
Why Choose an L-Shaped Layout for Your Outdoor Kitchen
The L-shape solves a real problem: cramped straight kitchens that force you into single-file work. Two perpendicular counter runs give you a prep station on one leg and grilling/cooking on the other. You can stand at the corner and access both without twisting around. Traffic doesn’t cut through your work zone, guests can pass behind without bumping your elbow while you’re plating.
Another win is storage efficiency. Two walls mean you fit more cabinetry into a tighter footprint than with an island or single counter. That’s especially valuable if your yard is modest or an odd shape. Corner spaces that seemed wasted become usable real estate.
L-shapes also encourage the workflow pros use: cold storage and prep on one side, heat and cooking on the other. You’re not moving raw steaks back and forth across a single line. This natural division keeps your space organized and makes entertaining easier, your guests know where the “prep zone” is and stay out of your way.
Finally, an L-layout hides unsightly plumbing and gas runs inside corner walls. Straight runs across open space force you to hide pipes along the outer edge, which looks messy and limits flexibility. A corner cabinet absorbs those utilities and keeps your views clean.
Essential Elements and Appliances for Your L-Shaped Design
Grill and Cooking Stations
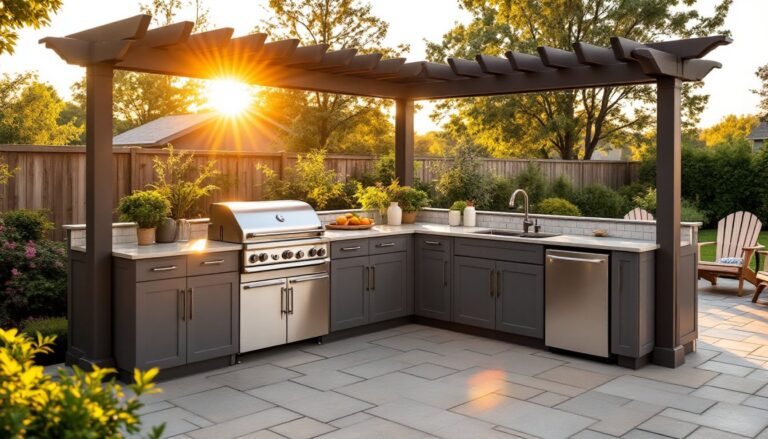
Your grill is the anchor. Most outdoor kitchens start with either a built-in gas grill (typically 24–48 inches wide) or a modular drop-in unit that sits flush with counters. Built-ins offer cleaner lines and integrate seamlessly: drop-ins are easier to replace if something fails. For an L-shaped layout, mount the grill on one leg, usually the leg facing your main seating area. This gives guests a good view and keeps smoke away from pathways.
Add a side burner next to the grill for sauces, sides, or boiling water. A 25,000–40,000 BTU side burner handles most tasks. Some folks skip this and add it later when budget allows, it’s genuinely nice but not essential.
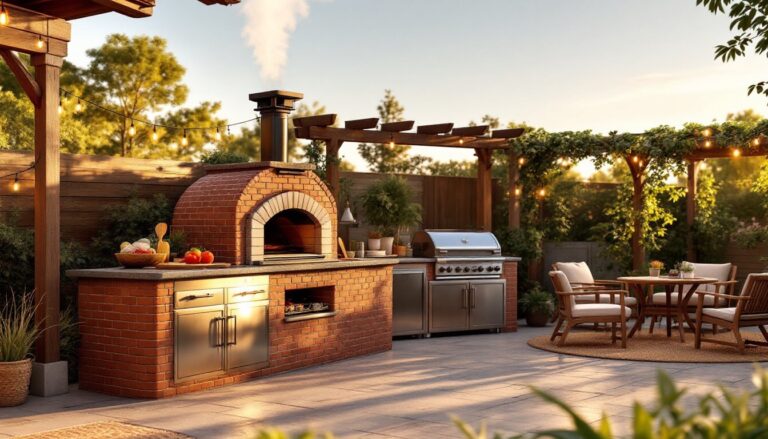
Consider a rotisserie, smoker, or pizza oven if space permits. These go on the second leg, opposite the main grill. A rotisserie bolts to existing grill frames. A dedicated smoker or wood-fired pizza oven is heavier and requires its own base, but they’re showstoppers and expand what you can cook.
Countertop and Storage Solutions
Counters take weather and heat. Stainless steel is industry standard, it resists corrosion and stays cool to the touch near heat sources. Granite and engineered stone also work but cost more and require annual sealing. Avoid wood: it warps and splits outdoors.
Aim for at least 36–48 inches of countertop space on each leg. One leg handles prep (cutting, plating): the other serves as a landing zone for cooked food. If your budget is tight, outdoor kitchen ideas on a budget walk through cost-saving swaps that don’t sacrifice durability.
Storage is where L-shapes shine. Two-leg kitchens accommodate more cabinetry than straight runs. Use marine-grade plywood or powder-coated steel cabinets rated for outdoor use. Avoid standard interior cabinets, moisture and UV will destroy them in two seasons. Include at least one drawer with a drip tray for ice, drinks, and perishables. Leave one lower cabinet open (no doors) for a mini fridge or outdoor cooler.
Add open shelving or a hutch on the corner wall for decorative storage and quick access to dishes and glassware. This breaks up the visual mass of cabinetry and makes the space feel less bunker-like.
Design Ideas and Styles to Match Your Home
Your outdoor kitchen should feel like an extension of your home, not a hardware store. If your house is Mediterranean-inspired, use warm terracotta or earth-tone tile for backsplashes and consider a curved counter corner instead of a hard 90-degree angle. A rustic stone surround around the grill softens the industrial feel of stainless steel.
For modern homes, embrace clean lines and minimalist finishes. Charcoal-colored cabinetry, brushed stainless steel, and a simple subway tile backsplash create sleek simplicity. Floating shelves or open metal frame storage keeps the vibe uncluttered.
Tropical or coastal homes pair well with weather-resistant wicker seating, soft blues or greens, and natural teak accents. A pergola or shade sail overhead ties the kitchen to the broader landscape and makes it feel intentional, not bolt-on.
Premier outdoor living spaces often feature custom cabinetry and integrated lighting. LED strip lights under overhangs or inside cabinets add ambiance and function for evening cooking. A dimmable system lets you shift from work lighting (bright) to entertaining (soft).
Don’t overlook plant-scaping. A few large potted shrubs or a living privacy wall (bamboo in a planter or climbing vines on a trellis) soften hard lines and tie the kitchen to your garden. Just keep plants back from grill exhaust: heat and smoke will scorch them.
Planning Your Layout: Measurements and Space Considerations
Start with the footprint. Measure your available space in both directions. A functional L-shaped kitchen needs at least 8 feet on each leg (though 10–12 feet is more comfortable). Tighter than that and your work zones feel cramped.
Draw the layout to scale on graph paper or use a free tool like SketchUp Free. Mark your grill’s location first, you want clearance for venting and easy access to the back. Most building codes require at least 24 inches of clear space behind a grill for maintenance. Check your local fire code: some areas mandate more.
Plan traffic flow. If your patio door opens onto the patio, don’t put your main counter directly in that path. Guests should be able to grab a plate and move to seating without stepping over your prep area. A small path of at least 3 feet wide should bypass the kitchen entirely.
Consider utilities. Gas and water lines are best run during framing (beneath your patio if you’re building new). If you’re retrofitting an existing patio, surface runs are messier but workable. Electrical for lights and a small fridge needs a GFCI-protected outdoor outlet. These may require a licensed electrician and a permit, depending on your jurisdiction.
Sun and wind matter too. A south-facing kitchen in a hot climate gets blistering in summer, add a pergola or shade sail. Wind can whip smoke across your seating or deflect grill heat: a windbreak (fence, hedge, or hardscape wall) helps. Custom outdoor living layouts account for these factors from day one.
Materials and Durability: Building to Last
Outdoor kitchens live 24/7 outdoors. Everything you choose will face UV rays, rain, temperature swings, and humidity. Cheap won’t last: plan to invest.
Cabinetry: Marine-grade plywood or solid composite materials withstand moisture. Powder-coated steel frames are lighter and rustproof. Interior grade plywood will delaminate in a single season outdoors. Spend the extra $500–1,000 upfront to avoid replacing cabinets in three years.
Countertops: Stainless steel is bulletproof but fingerprint-prone. Engineered stone (quartz or solid surface) resists stains and heat better than granite, which can discolor from oils and requires sealing every 1–2 years. Tile is durable but grout needs maintenance. Most pros recommend stainless or engineered stone for L-shaped kitchens: they’re forgiving.
Hardware: Stainless steel hinges, handles, and fasteners only. Zinc-plated hardware will rust within months. This sounds obvious, but many outdoor kitchen kits skimp here.
Grill Selection: A mid-range 40,000+ BTU stainless grill ($800–1,500) will outlast a budget model by years. Budget grills rust through the cooking grates in 2–3 seasons: quality units last 7–10 years. HGTV’s outdoor kitchen ideas show what grade makes sense for different budgets.
Sealants and Finishes: Use marine-grade caulk (silicone, not acrylic) for any gaps. Paint and stain designed for exterior wood are essential if you use wood trim, interior products will peel and fail. Annual maintenance (resealing stone, checking caulk, wiping cabinetry) keeps everything looking fresh and extends lifespan by years.
Budget for build-out at $5,000–$15,000 for a solid mid-range L-shaped kitchen (grill, cabinetry, counters, basic finishes). Premium materials or custom masonry can run higher. Permits, utility work, and professional installation add $1,000–$5,000 depending on your location and scope. Most homeowners find the investment worth it: an outdoor kitchen is one of the highest ROI home improvements if you actually use it.
Building Your L-Shaped Outdoor Kitchen
An L-shaped layout gives you the efficiency of a real kitchen without the footprint. Two perpendicular counters, smart appliance placement, and durable materials create a space you’ll actually cook in and enjoy. Start by measuring your yard, sketching your layout, and being honest about budget. Order quality cabinetry and a mid-range grill, these are your workhorses and worth the investment. Plan utilities and drainage early, and don’t skip prep work or permits if your area requires them. The payoff is a functional outdoor kitchen that becomes the heart of summer entertaining and adds genuine value to your home.