Table of Contents
ToggleBuilding an outdoor kitchen with a built-in smoker transforms your backyard into an entertainment hub and a genuine extension of your home. Whether you’re hosting weekend gatherings or smoking brisket for the neighborhood, an outdoor kitchen with smoker combines functionality with the appeal of outdoor living. This guide walks you through the essentials, from layout planning and smoker selection to installation and ongoing maintenance, with the practical honesty you need to succeed. Let’s get your outdoor kitchen project off the ground.
Key Takeaways
- An outdoor kitchen with smoker transforms your backyard into a functional entertainment hub, requiring careful layout planning that accounts for space, utilities, traffic patterns, and local building codes.
- Choose between standalone smokers ($200–$800) for flexibility and affordability or built-in options ($1,500–$5,000+) for a permanent, integrated look that requires proper ventilation and permitting.
- Invest in durable, weather-resistant countertops like granite or concrete, along with essential features such as a prep sink, storage cabinets, GFCI-protected electrical circuits, and proper drainage to ensure long-term functionality.
- Secure necessary permits before starting construction, hire licensed professionals for gas, water, and electrical work, and follow local codes for clearances and foundation requirements to protect safety and resale value.
- Maintain your outdoor kitchen smoker by cleaning grates after every 3–4 cooks, inspecting gas connections quarterly, resealing countertops annually, and monitoring structural components to extend lifespan and prevent costly repairs.
Planning Your Outdoor Kitchen Layout
Start with a clear understanding of your space and how you’ll actually use it. Measure your patio, deck, or yard and account for traffic patterns, utilities (gas, water, electrical), and prevailing winds. Most building codes require outdoor kitchens to be at least 10 feet from property lines and any structures, but check your local ordinances, requirements vary significantly by jurisdiction.
Sketch a rough layout on paper or using a simple design tool. The classic work triangle (prep area, cooking area, cleanup station) works outdoors too. Position your smoker where smoke won’t drift directly toward seating or neighboring properties. If you’re installing a built-in smoker, you’ll need a solid foundation, either a concrete pad or a properly reinforced deck structure. Nominal deck joists (typically 2×8 or 2×10) can usually handle the weight, but a kitchen island with a smoker may require reinforcement or a post-and-footing foundation. When in doubt, consult a local contractor or building inspector: structural mistakes are expensive to fix after the fact.
Consider the workflow: prep on one side, grill and smoker in the middle, cleanup near your water source. Allow at least 24 inches of counter space on both sides of the smoker for safety and usability. Shade is a bonus, a pergola or awning keeps you comfortable while cooking and extends your season.
Choosing the Right Smoker for Your Space
Your smoker is the centerpiece, so choose wisely. First, decide between fuel types: charcoal offers authentic smoke flavor and portability: gas (propane or natural line) provides temperature control and convenience: electric is compact and beginner-friendly: and wood-fired adds aesthetic appeal but demands more skill and maintenance.
For an outdoor kitchen, offset barrel smokers and drum smokers are popular standalone options because they’re affordable (typically $200–$800) and versatile. If you want a permanent built-in solution, look at custom-built masonry smokers or high-end pellet smokers designed for integration. Built-in smokers range from $1,500 to $5,000+ installed, depending on materials and craftsmanship.
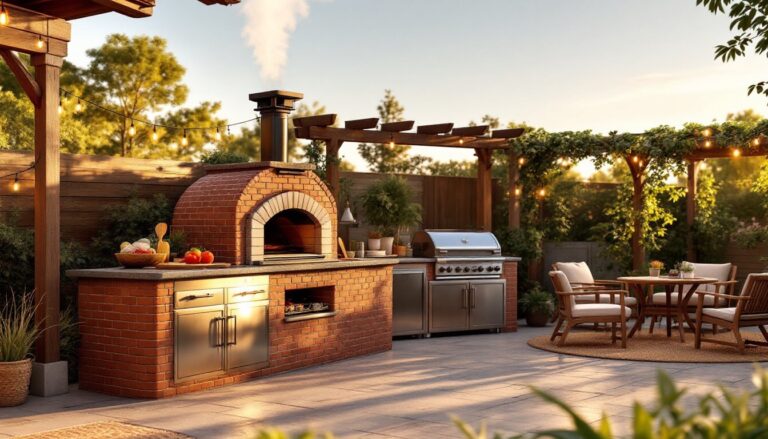
Standalone vs. Built-In Smoker Options
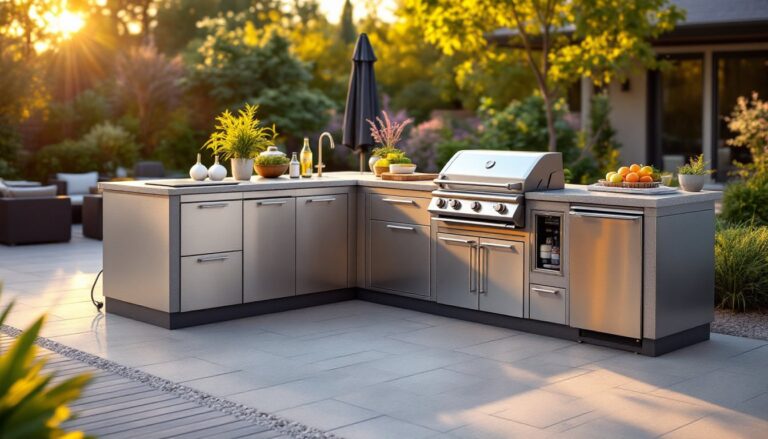
Standalone smokers offer flexibility: you can relocate them if needed, replace components more easily, and start small without a major investment. A barrel smoker or vertical drum unit occupies roughly 2 to 3 feet of counter space and can sit on a sturdy stand or concrete pad. For many DIYers, this is the practical starting point.
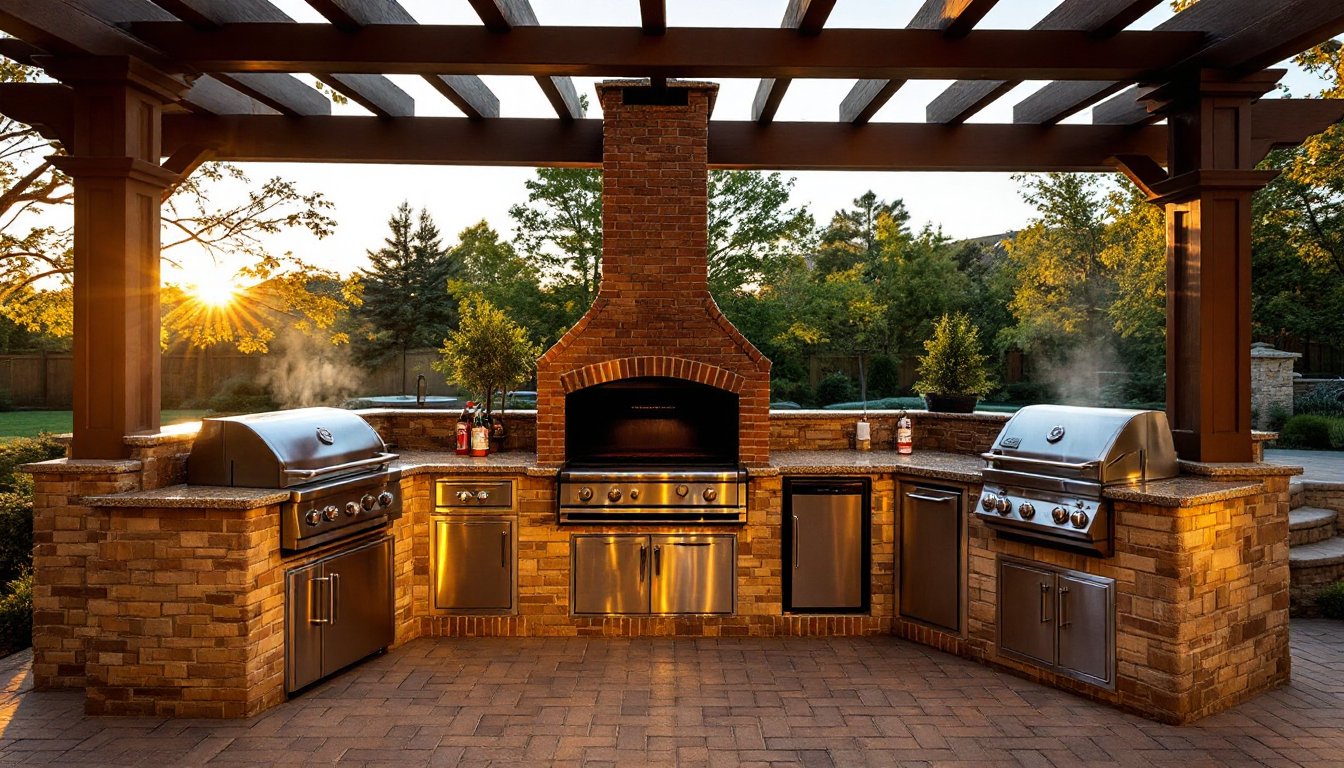
Built-in smokers, whether integrated into a masonry structure or a custom stainless-steel insert, require careful planning. You’ll need to ensure proper ventilation, include a drip tray and ash management system, and often get permitting approval. Professional masonry smokers are stunning but involve substantial labor costs. A custom-built stainless outdoor kitchen with smoker, visible on impressive outdoor kitchen builds, demonstrates how high-end integration can elevate your space. But, for most DIY projects, a quality standalone smoker paired with a weatherproof cover offers the best balance of cost, customization, and long-term satisfaction.
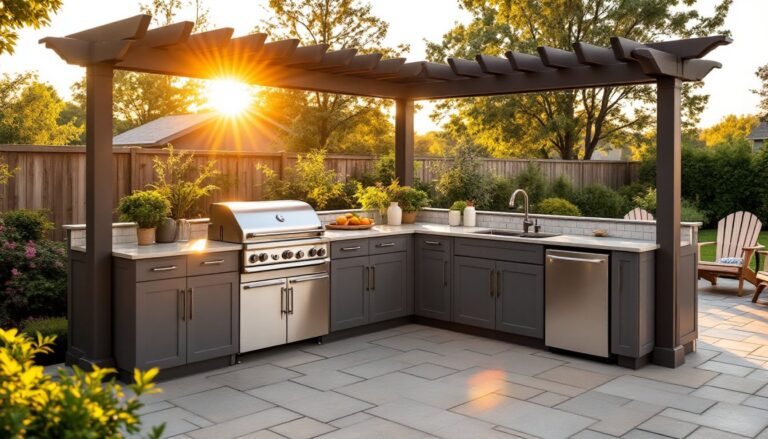
Essential Features and Countertop Selection
Your countertops set the tone and must withstand outdoor conditions. Granite and concrete are durable, heat-resistant, and look professional, concrete costs roughly $50–$100 per square foot installed, while granite runs $100–$200+. Tile requires careful grout selection (urethane-based, not standard grout) and proper sealing. Stainless steel counters integrate beautifully with smokers and grills but fingerprint easily and need regular maintenance.
Beyond the cooking surface, include storage cabinets (marine-grade plywood with stainless hardware resists rot), a prep sink with hot and cold water lines, and electrical outlets protected by GFCI circuit breakers. Most outdoor kitchens need at least one 20-amp dedicated circuit: if you’re adding a built-in smoker or future upgrades, run 2–3 circuits during the initial electrical install. Hire a licensed electrician for any hardwired work, DIY electrical mistakes create fire and shock hazards.
A side burner or grill complements your smoker, allowing you to sear or sauté while low-and-slow smoking happens. Many homeowners appreciate outdoor kitchen ideas on a budget that scale functionality without excessive cost. Good ventilation is essential: a range hood or overhead vent reduces smoke in your face and keeps your kitchen cleaner. Consider insulating the interior walls of your kitchen structure to protect neighbors from excessive heat radiation, and always follow local building codes about clearances and venting.
Installation and Safety Considerations
Before you order materials, confirm permit requirements with your local building department. Many jurisdictions require permits for outdoor kitchens, especially those with gas lines, electrical, or permanent structures. A permit costs $50–$300 but ensures your project meets code and protects your home’s resale value. Skipping permits invites fines and inspection failures when you sell.
For the foundation, a reinforced concrete pad (4 inches thick, reinforced with rebar or wire mesh) is standard. Ensure proper drainage so water doesn’t pool underneath. If you’re building on a deck, verify that the joists and beams can handle the concentrated load: a fully loaded outdoor kitchen easily weighs 1,000+ pounds. Posts and footings below the frost line (depth varies by region, check local code) prevent settling and heaving.
Gas and water lines require licensed professionals in most areas. Propane lines need proper sizing, pressure regulation, and a shutoff valve near the smoker. Natural gas requires a dedicated line from your house meter. Water supply and drain lines must slope appropriately and be insulated in freezing climates. Electrical work should also be done by a licensed electrician: GFCI protection is mandatory for all outdoor outlets.
Safety during construction and use: wear safety glasses and work gloves when handling stone and metal: use hearing protection when cutting or grinding: ensure proper ventilation when using power tools. For the finished kitchen, keep a fire extinguisher nearby (Class B for grease fires), maintain clearance around the smoker (at least 10 feet from combustibles), and never leave a lit smoker unattended. Custom outdoor living spaces benefit enormously from thoughtful safety planning during the design phase.
Maintaining Your Outdoor Kitchen Smoker
Once your outdoor kitchen with smoker is running, maintenance keeps it functional and extends its lifespan. Clean your smoker’s grates and interior after every 3–4 cooks: grease buildup accelerates rust and creates uneven heat zones. Empty the ash pan and check the thermometer for accuracy. If you’re using a charcoal smoker, replace the thermometer seal (usually felt or rope caulk) annually.
Inspect gas connections quarterly for leaks using a soap solution, bubbles indicate a leak. Tighten hose clamps and replace hoses every 5 years or if they show cracks. Propane tanks should be stored upright in a cool, shaded spot, never in direct sun or near heat sources. For water and drain lines, insulate them if you live in a cold climate and flush lines before winter to prevent freezing damage.
Countertops need seasonal care: reseal granite and concrete every 1–2 years, depending on use and climate. Wash stainless-steel surfaces with a soft cloth and mild detergent: use the grain direction to avoid scratching. Cover your smoker and grill with weatherproof covers during off-season or harsh weather. Resources like The Spruce offer comprehensive seasonal maintenance checklists.
If your smoker shows rust, address it promptly with a wire brush and rust converter, then repaint with high-temperature paint (good to 1,200°F). A dented thermometer or crack in the firebox usually means replacement is safer than repair. Keep a maintenance log, noting when you last replaced seals, serviced the grill, or sealed countertops, so you don’t overlook critical tasks.
Conclusion
Building an outdoor kitchen with smoker is an investment in your home and your entertaining lifestyle. Success hinges on honest planning, choosing the right smoker for your needs, and respecting safety and code requirements from day one. Whether you go standalone or built-in, the key is starting with a solid foundation, both literally and in terms of layout. With thoughtful maintenance and a bit of care, your outdoor kitchen will deliver years of gatherings, great food, and genuine value.