
Table of Contents
ToggleAn <a href="https://youcanpaddle.com/modern-outdoor-living-space-ideas/”>outdoor kitchen island isn’t just a grilling station, it’s the centerpiece of backyard living. Whether you’re flipping burgers for the neighborhood or hosting weekend gatherings, a well-built island keeps food prep, cooking, and cleanup off your main deck. Unlike a freestanding grill, an outdoor kitchen island provides counter space, storage, and the kind of functionality that makes outdoor cooking feel effortless. This guide walks you through planning, building, and maintaining an island that’ll serve your family for years without eating into your budget or requiring a contractor’s deep pockets.
Key Takeaways
- An outdoor kitchen island keeps food prep, cooking, and cleanup off your main deck by providing counter space, storage, and functionality that eliminates exhausting trips between your grill and house.
- Location and size matter critically: position your island 10-20 feet from the house with shade and wind protection, and choose dimensions (4×2 feet for modest patios, 6-8 feet for entertaining) based on your patio layout and cooking habits.
- Essential features depend on your cooking style—a grill and counter space work for casual grilling, while frequent entertainers should invest in a sink, refrigerator drawer, and durable cabinetry for a complete outdoor kitchen.
- Budget-friendly outdoor kitchen islands range from $2,500-$4,000 with DIY labor, while mid-range builds ($6,000-$10,000) add plumbing and appliances, and premium islands ($15,000+) feature multiple zones and professional-grade materials.
- Choose weather-resistant materials like stainless steel (Type 304/316), sealed concrete, composite cabinetry, and engineered stone to avoid costly repairs—cheap materials fail within three years while quality construction lasts 10-15 years with basic maintenance.
- Regular upkeep—monthly stainless steel cleaning, annual resealing of concrete and stone, grill grate brushing, and prompt repairs—prevents small maintenance issues from becoming expensive structural failures.
Why Outdoor Kitchen Islands Transform Your Backyard
An outdoor kitchen island solves the most common backyard cooking complaint: distance. When your grill sits 50 feet from the kitchen door, you’re making extra trips for utensils, seasonings, and plates. An island with counter space and storage keeps everything within arm’s reach. You can prep vegetables, season meat, and stage your plates while the grill works. Year-round, an island becomes the hub of outdoor entertaining. Summer dinners, fall tailgates, and spring weekend mornings all center around a functional cooking space. Beyond practicality, an island raises your home’s outdoor appeal. Potential buyers, neighbors, and guests notice a well-built outdoor cooking station. It signals that you take your outdoor living seriously, which translates to property value and genuine enjoyment. Even a modest outdoor kitchen ideas on a budget approach beats struggling with a countertop grill and a folding table.
Choosing the Right Location and Size for Your Island
Location matters more than most DIYers realize. Your island needs shade during peak cooking hours, nothing kills an outdoor dinner faster than standing over a hot grill in direct summer sun. Plant a nearby tree or plan for a covered structure (patio umbrella, shade sail, or pergola) if your yard lacks natural shade. Wind is equally important. A strong breeze pushes smoke and heat around, making cooking uncomfortable and unpredictable. Position your island away from the main wind direction for your region, or use windbreaks like fences or dense plantings. Proximity to the house matters too. Too close, and heat/smoke blow into your kitchen windows. Too far, and kitchen access becomes a burden. Most backyard cooks find 10–20 feet from the house ideal. Check for underground utilities before you dig. Call 811 (Dig Safe) to mark gas, electric, and water lines. One overlooked cable or pipe costs far more than a phone call.
Size depends on your space and cooking habits. A modest 4-foot-by-2-foot island suits smaller patios and lets one cook work comfortably. Serious entertainers want 6–8 feet of counter space and room for two people to move around. Modern outdoor living space ideas often feature islands paired with lounge seating nearby, keep that flow in mind. Measure your patio, sketch the island, and walk the outline with a garden hose. Living with the footprint for a day reveals whether your layout works. Islands require solid, level ground. Sunken patios or sloped yards need fill, grading, or a raised platform. Poor grading leads to water pooling around your island, rotting wood and undermining structural integrity over time.
Essential Features and Appliances to Include
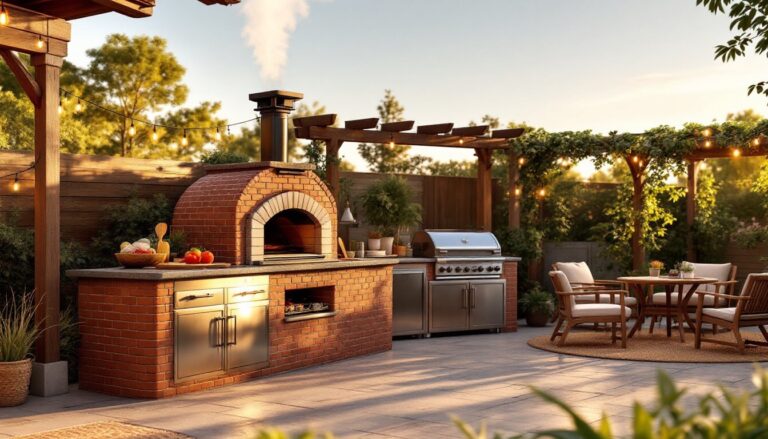
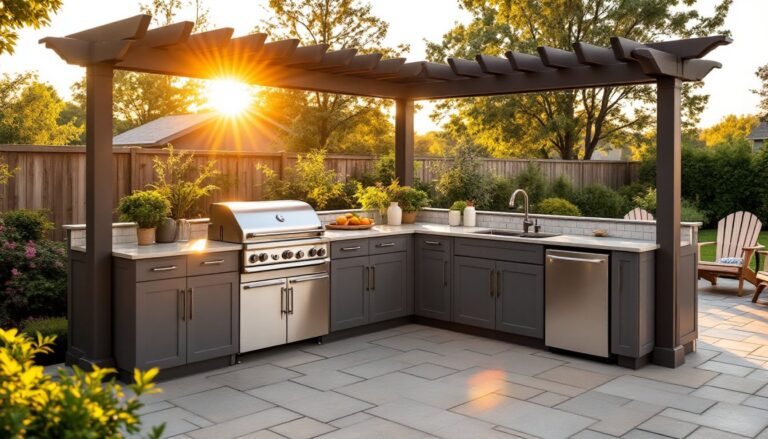
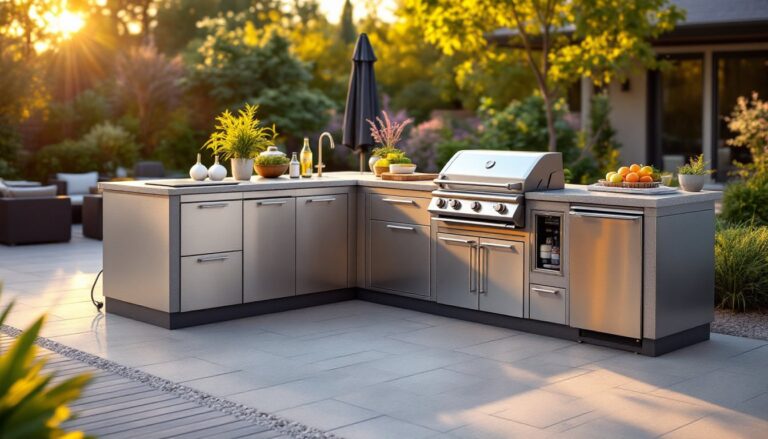
A grill is the obvious centerpiece, but storage and prep space drive real functionality. Built-in or drop-in gas grills (most DIYers choose 24–36 inches wide) pair naturally with stainless steel countertops or concrete surfaces. A refrigerator drawer keeps beverages, prepared sides, and condiments cold without the walk to the house. Small under-counter units run about $400–$800 and pull 110V power. A sink with running water transforms an island from a grill into a complete kitchen. You’ll need to plumb water and drainage lines, a licensed plumber isn’t optional here if you’re pulling permits (and you should be). Expect $800–$2,000 for a simple undermount sink with supply lines. A mini fridge or beverage cooler is budget-friendly and doesn’t require plumbing. Stainless steel construction handles weather better than plastic. Storage drawers and cabinets below counter keep tools, wood, charcoal, and serving dishes organized. Simple weatherproof cabinetry rated for outdoor use prevents rust and rot. Some builders add a side burner (about $150–$400) for sauces, boiling water, or warming sides. Consider your cooking style, if you grill 2–3 times per week and mostly cook protein, a grill and counter space might be all you need. If you entertain frequently or cook complex meals outdoors, a sink and fridge become non-negotiable. Built-in barbecues offer professional-grade durability if your budget stretches there.
Materials That Withstand Outdoor Conditions
Not all building materials survive wet, hot, and UV-exposed outdoor environments. Stainless steel (Type 304 or 316 grade) resists rust and is cleanable with simple soap and water. Avoid cheap “stainless-look” finishes that rust within a season. It costs more upfront but saves refinishing headaches later. Concrete offers durability and clean aesthetics. A sealed concrete countertop or base handles temperature swings and weathering better than untreated wood. Use outdoor-rated sealer reapplied annually. Marine-grade or composite cabinetry replaces wood in wet zones. Pressure-treated lumber works for structural framing, but finish it with exterior paint or stain to block moisture. Don’t use interior plywood, the glues delaminate outdoors. Tile or stone countertops look polished and last decades if properly sealed. Natural stone requires annual sealing: engineered stone (quartz) is lower maintenance. Grout lines trap moisture, so slope counters slightly to shed water. Stucco or stone veneer wraps the base attractively and resists weather, though minor cracks need patching every few years. Interior drywall has no place outdoors, use cement board or fiber cement board if you need a substrate. Metals corrode, wood rots, and concrete cracks if you skip material prep. Cheap materials save $500 now but cost double that in repairs within three years. Hunker’s home improvement guides cover outdoor material selection in depth if you want to dive deeper into comparisons.
Budget-Friendly vs. Premium Build Options
A no-frills DIY island, a basic frame, stucco or stone base, stainless steel countertop, and a drop-in grill, runs $2,500–$4,000. You’re providing labor: material costs dominate. This build lasts 10–15 years with moderate maintenance. A mid-range island adds a sink (plumbing included), under-counter fridge, weatherproof cabinetry, and tile or sealed concrete countertops. Budget $6,000–$10,000. Labor costs climb if you hire a plumber and electrician. A premium island, multiple appliances, built-in refrigeration, professional stainless cabinetry, engineered stone counters, and integrated seating, pushes $15,000+. Some outdoor kitchens with multiple zones (grill area, prep station, beverage center) hit $25,000–$50,000. Your budget should match your cooking frequency and entertaining style. If you grill once a month, a simple grill island with counter space is plenty. If you cook outdoors 3+ times per week and host regularly, invest in storage, plumbing, and durable materials. Doing demo, framing, and finishing yourself cuts costs significantly, plumbing and electrical nearly always require permits and licensed professionals. Material suppliers often offer bundle deals for outdoor kitchens: compare concrete, stainless, and cabinet packages before committing. Outdoor living spaces contractors can quote full builds if DIY feels overwhelming.
Maintenance Tips to Keep Your Island Looking New
An outdoor island exposed to sun, rain, and temperature swings needs regular care. Stainless steel requires monthly wipe-downs with a microfiber cloth and mild soap. Salt air (coastal areas) demands more frequent cleaning. Never use abrasive scouring pads, they scratch the finish. Sealed concrete and stone need annual resealing, especially in cold climates where freeze-thaw cycles crack surfaces. Pressure wash annually to remove algae and mold, but avoid high pressure directly on sealer, use 1,500 PSI or less. Grout and tile collect dirt and trap moisture. Seal grout every 2–3 years and replace damaged sections promptly. Cabinetry and wood trim should be inspected twice a year for rot, loose fasteners, or paint peeling. Touch up damage immediately before moisture penetrates. Grill grates and firebox benefit from brushing after each cook and occasional deep cleaning. Remove grease buildup to prevent flare-ups and corrosion. Off-season (winter in cold climates), drain water lines, cap vents, and cover the island if possible. Small preventative tasks, tightening hardware, resealing joints, replacing weatherstripping, cost nearly nothing but extend island life by years. Most failures stem from skipping small repairs until they become big ones.
Conclusion
Building an outdoor kitchen island transforms how you cook and entertain outside. Start with honest planning, measure twice, dig safely, and choose materials matched to your climate. Whether you go budget-friendly or premium, prioritize prep space and a solid grill. Maintenance is straightforward if you address problems early and use appropriate materials. Custom outdoor living spaces reflect your style and needs, making every backyard unique. Your island will earn its spot in your outdoor world quickly.