Table of Contents
ToggleAn <a href="https://youcanpaddle.com/how-to-create-an-outdoor-entertaining-area/”>outdoor kitchen pergola combines form and function, a semi-shaded structure that anchors your backyard entertaining space while protecting cooking and dining zones from sun and light rain. Whether you’re a DIY builder ready to frame and install materials yourself or someone hiring professionals for the heavy lifting, understanding the basics of pergola design, construction, and kitchen integration is essential. This guide walks you through planning, building, and maintaining an outdoor kitchen pergola that transforms your backyard into a destination.
Key Takeaways
- An outdoor kitchen pergola combines a semi-shaded overhead structure with cooking appliances and countertops, offering partial shade and airflow while supporting grills, sinks, and storage without the cost of a full roof.
- Proper sizing (typically 12’×14′ to 16’×18′), orientation (east-west for afternoon shade), and load-bearing posts (4×4 or 6×6 lumber with concrete footings) are essential for kitchen-grade pergolas that handle appliance weight and foot traffic.
- Before construction, verify local permits, setback requirements, frost-line depth, and utility locations to avoid costly rework and ensure NEC compliance for electrical circuits and gas lines.
- Use pressure-treated lumber, cedar, or composite materials with galvanized bolts and proper sealing to prevent rot; avoid nails in favor of deck screws and joist hangers for weather resistance.
- Maintain your pergola annually by inspecting posts for rot, resealing wood every 2–3 years, clearing debris, and checking hardware—a well-maintained outdoor kitchen pergola lasts 15–20+ years with consistent care.
What Is an Outdoor Kitchen Pergola?
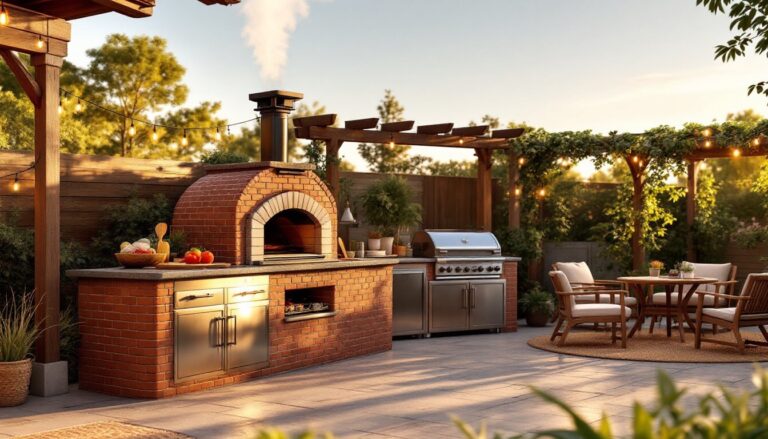
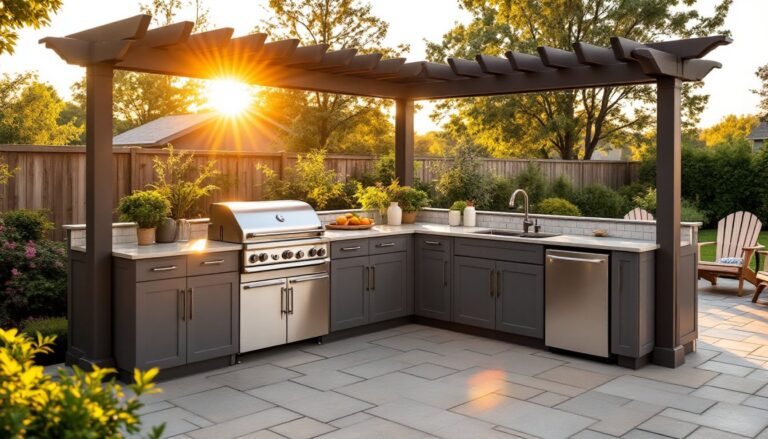
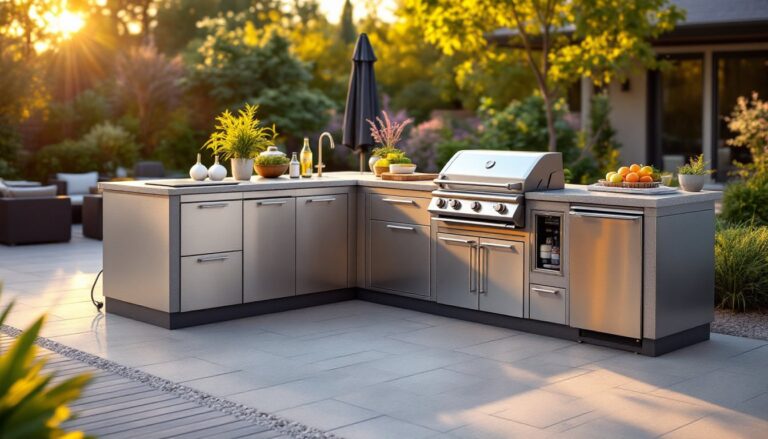
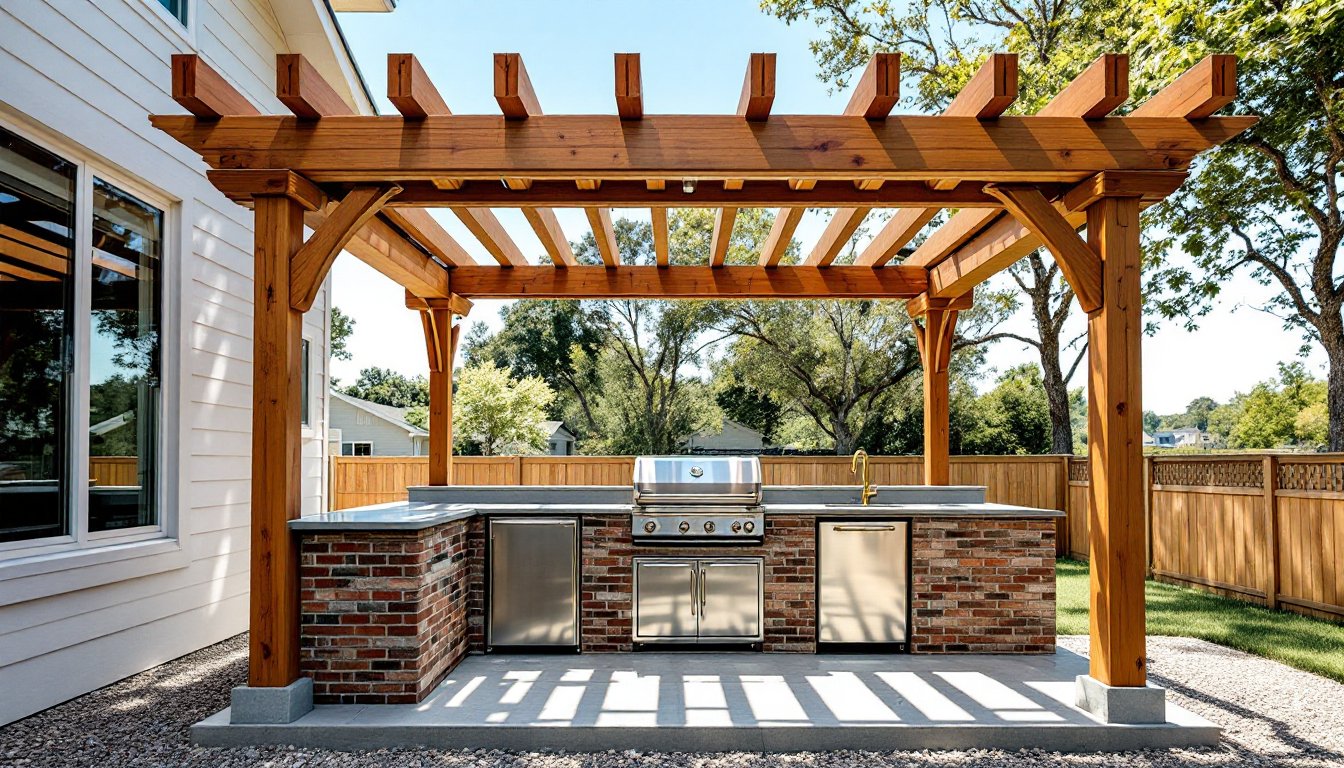
A pergola is an open-roof garden structure with cross-beams, typically attached to your house or freestanding in the yard. Unlike a solid roof or gazebo, a pergola’s slatted overhead allows dappled sunlight and airflow, ideal for cooking without feeling boxed in. An outdoor kitchen pergola pairs this structure with grill installations, countertops, sinks, and storage, creating a fully functional cooking zone.
The key distinction: traditional pergolas are decorative garden features, while kitchen pergolas are engineered for appliance support and foot traffic. Load-bearing requirements change the math on post size, spacing, and foundation depth. Hardscaping resources like Gardenista explain pergola anatomy, posts (typically 4×4 or 6×6 lumber), main beams (2×10 or 2×12), and cross-beams (2×6 or 2×8). A kitchen version adds concrete footings, gravel bases for drainage, and sometimes reinforced headers to carry the weight of outdoor refrigerators and built-in grills.
Key Design Benefits and Features
Pergolas deliver practical and aesthetic wins. First, they provide partial shade without the cost and permanence of a full roof, think 50% light reduction on a sunny afternoon, enough to keep guests comfortable and grills running cooler. Second, they’re modular: you can add shade cloth, removable panels, or retractable awnings later if you want more coverage.
They also frame views, define outdoor zones, and add curb appeal. A well-built pergola signals intentional design. For budget-conscious homeowners, outdoor kitchen ideas on a budget show how a pergola anchors an affordable build, focusing dollars on the structure rather than pricey stone or hardscaping. Beyond aesthetics, pergolas resist wind better than solid structures (wind flows through slats rather than pushing against them) and allow rain to drain gradually rather than pooling on a flat roof. Post-and-beam design also makes future modifications easier: want to upgrade the grill or add a sink? You’re not tearing apart a roof system.
Planning and Design Considerations
Before breaking ground, nail down size, orientation, local codes, and utility placement.
Size and Footprint
Most kitchen pergolas measure 12′ × 14′ to 16′ × 18′. Smaller (10′ × 12′) feels cramped with a grill and guests: larger requires substantial posts and deeper footings. Sketch your space to scale, marking sun angles at different times of day. An east-west orientation gives afternoon shade: north-south maximizes morning sun for breakfast entertaining.
Permits and Setbacks
Check your local building department. Pergolas over 200 square feet often need permits, especially if attached to your house or over 10 feet tall. Verify setback requirements (distance from property lines), wind and snow load zones, and whether your soil can support post footings, clay-heavy yards may need deeper footings or gravel beds. A quick call to your inspector saves rework.
Utilities and Layout
Mark gas, electrical, and water lines before digging. Outdoor kitchens need dedicated circuits (typically 240V for an electric grill: 30-amp minimum per NEC standards), gas runs, and water supply/drainage. Position appliances to avoid these lines, or hire a licensed electrician and plumber for runs. Modern outdoor living spaces often integrate these elements cleanly by planning locations first rather than retrofit.
Building Your Pergola: Materials and Installation
Materials
Choose pressure-treated lumber (PT), cedar, or composite. PT lumber is affordable and rot-resistant: expect nominal 4×4 posts to be 3.5″ × 3.5″ actual. Cedar looks premium but costs 2–3× more and requires sealing every 2–3 years. Composites (vinyl or plastic-lumber) resist rot and need no stain, but carry higher upfront cost.
For footings, use concrete footer posts (12″ diameter, 36″ deep in most climates: dig below frost line for your region). Mix post holes with gravel first for drainage, soggy footings rot wood. Galvanized bolts, joist hangers, and flashing prevent rust and water infiltration. Deck screws (not nails) resist weather better.
Installation Steps
- Layout and mark post locations with string and stakes.
- Dig holes (frost-line depth varies by region, check local codes).
- Set posts in concrete: verify plumb and square with a 4-foot level and framing square.
- Install main beams using galvanized joist hangers and bolts: avoid toe-nailing in outdoor structures.
- Attach cross-beams with deck screws or lag bolts, spacing them 12–24″ apart for visual balance and partial shade.
- Seal or stain all exposed wood within weeks of install, exposure to sun and moisture degrades untreated lumber fast.
If this feels overwhelming, hiring a contractor to frame the structure is reasonable: many DIYers pour foundations and install appliances themselves. Fix This Build That and similar resources walk through woodworking fundamentals if you want to tackle the framing.
Integrating Kitchen Elements and Appliances
Once the pergola frame is up, bring in utilities and appliances.
Appliance Mounting
Built-in grills mount on a sturdy island or cart, never directly on wood framing. A brick or stone base with a metal grill surround distributes heat and protects wood above. Gas grills need a professional-grade regulator and stainless-steel flex line (not rubber). Refrigerators, ice makers, and sinks require 240V circuits and dedicated water/drain lines. Don’t hack this together with extension cords: a licensed electrician ensures NEC compliance and your homeowner’s insurance stays valid.
Countertops and Prep Space
Stainless steel and composite outdoor counters resist weather and staining. A minimum 2-foot prep surface on either side of the grill is practical. Granite and tile are heavier, confirm post load capacity (a good rule: each 4×4 post in a kitchen setup carries roughly 1,000–1,500 lbs if properly footed: check with a structural engineer if in doubt).
Storage and Finishes
Add outdoor cabinetry or weatherproof storage for tools, napkins, and supplies. Seal wood trim and fascia with a high-quality deck stain or spar polyurethane (reapply annually). Custom outdoor living projects often include these finishing touches, they distinguish a professional result from a bare frame.
Maintenance and Long-Term Care
A well-built pergola lasts 15–20+ years. Maintenance is straightforward but consistent.
Annual Tasks
- Inspect posts and beams for rot, especially where wood meets concrete.
- Reapply deck stain or sealant every 2–3 years (weather and sun fade finishes fast).
- Clear debris from joints and under slatted roofs, leaves and standing water invite rot.
- Check bolts and hardware for rust: tighten or replace galvanized fasteners as needed.
Appliance Care
Cover grills in off-season. Service gas lines annually for leaks. Clean range hoods and screens monthly if you cook frequently. Stainless-steel surfaces need occasional oil or cleaner to resist fingerprints and salt spray (especially near ocean).
Repairs
Small rot (surface splintering) can be sanded and sealed. Large structural rot in a post or beam requires replacement, don’t ignore it, as it spreads and compromises stability. The Spruce offers detailed guides on wood maintenance if you want deeper dives. Most homeowners can handle staining and tightening: structural repairs (rotted posts, failed footings) warrant a contractor.
Conclusion
An outdoor kitchen pergola bridges shelter and openness, giving you a comfortable, functional entertaining zone without the expense or permanence of a full patio roof. Success hinges on solid planning, checking codes, sizing posts correctly, securing utilities, and committing to annual maintenance. Whether you build it yourself or hire help for framing, the payoff is a backyard space your household will use for years. Start with a clear design, invest in proper materials and footings, and enjoy hosting friends and family under your own custom pergola structure.